Detailed Explanation: The Installation Process of Sliding Barn Door Hardware Kit

After installing barn doors for so many years, there are too many people who have asked me about the installation method. Today, I write down all the installation methods as your reference, and hope it will be helpful for you. The barn door is composed of door panels and hardware accessories. The door panels are mainly wooden door panels, and other door panels are supplemented. They are divided into solid wood door panels, composite paint door panels, compressed door panels, glass door panels, plastic door panels, and so on. Commonly used hardware accessories are guide rails, pulleys, armor tubes, screws, expansion screws, swing stoppers, etc.
The sliding barn door hardware kit are shown in the picture:

Detailed introduction of barn door hardware accessories:
Generally, a single-opening barn door is composed of two pulleys. The screws on the pulleys are used for doors with a thickness of 40 to 45 mm. If the thickness of the door is different, the screws should also change accordingly. There are many types of pulleys.
A variety of styles, common styles are as follows:

Before installing the barn door, we need to calculate the specific punching position according to the specific size of the pulley, and arrange the specific punching position to avoid losses caused by punching errors. Because of different processing techniques, the pulley materials of barn doors are mainly divided into stainless steel and high titanium steel.

Barn door guide rail: The guide rail of the barn door is generally divided into single guide rail and multiple guide rails. The length of the barn door guide rail ranges from 4 ft -20 ft. The barn door guide rail can be customized according to the actual needs of customers. Appropriate lengths, sizes and distances for drilling are also different, so before installing barn door rails, measure the size of the holes to avoid holes that don’t match when punching holes in the wall.
The length of the guide rail of the barn door is generally more than twice the width of the door. Sometimes it can be appropriately lengthened for the purpose of fixing. The specific connection method and connection effect are shown in the figure, and the actual installation effect is shown in the figure below:

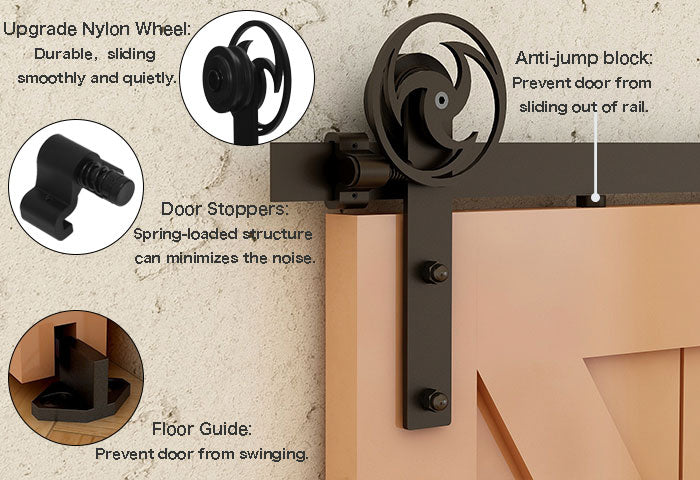
Generally speaking, the plastic swing stopper can also be used for a long time, but the metal swing stopper is more durable, and when there are water pipes or floor heating installed, when we cannot drill holes on the ground, we can put The straight plate device is selected to be installed on the wall, that is to say, the side-mounted swing stopper should be installed with special attention, because some families use floor tiles. When drilling holes in the floor tiles, it is easy to crack and affect the appearance. Installation skills and installation experience are required. The barn door limiter is installed at both ends of the track to limit the distance and braking effect of the door. There are rubber pads on the barn door. Playing a buffering role, there are six-hole screws on one side of the limiter, which can adjust the tightness of the limiter, and fix the limiter on the guide rail by adjusting the screws.

①
ATTACH STEEL HANGERS TO YOUR DOORS
Drill 7/16" holes at the distances from the top of the doors shown in the above chart.
Note: The Hanger Bolts are inserted through the back of the door
②
INSTALL ANTI-JUMP PAD
As shown in the illustration, the screw is near the front edge of your door
(recommended: drill pilot hole to avoid splitting). Do not over tighten.
 ③
③
CONNECT TRACKS AND INSTALL DOOR STOPPERS
Connect your tracks with junction plates if needed.
Loosely install the Door Stoppers near each end of the track
④
DRAW LINE FOR THE TRACK
Using a level, draw a line to install the Track,
at the door height + 1-11/16" above the floor.
⑤
MARK AND DRILL TRACK HOLES
Line up a Track on the line and mark the location of the holes.
Note: holes are 16" apart, line up with wall studs if possible.
Concrete wall: Drill holes by using a 3/8" concrete drill bit.
Wood framed wall: Drill out the holes by using a drill with 1/4" drill bit.
⑥
INSTALL THE TRACK
Using the Spacers, Long Lag Screws, and Washers (and hollow wall anchor if necessary),
Tip: Loosely attach one end of the Track with the other end resting on the ground.
Then swing track up and attach other end. Finally, fill in the middle holes
⑦
INSTALL YOUR DOORS
Hang your Steel Hangers on the Track,
and then twist the Anti-Jump Pad toward to the wall so that it is under the Track.
⑧
INSTALL THE FLOOR GUIDE
Position the door at your desired close position, put half of the floor guide under the door,
mark the location, and then fix guide to the floor.
Position doors in your desired closed and open position and adjust Door Stoppers.


